Considering I am now an aws certified developer I felt it was time to move past Wordpress and traditional web hosting for my website and blog. I wanted two elements for the new site:
- A clean landing page with links to socials and contact details
- Migrate the blog from Wordpress to a static site
Landing pages are a little ‘old school’ but it provides a contextual background for what I do with a full page image. The delayed load of social links draws attentions to where I publish a lot of my work. Finally the link at the bottom provides additional detail on what I do with a link to the blog is intended to draw the audience in the ‘know more’

Landing Page
The entire landing page is coded from scratch, no templates or frameworks, just raw hand crafted HTML as nature intended. The scrolling background is a layup of a .png image with the graduated fade overlaid on a wide image in the background. I experimented with JS and CSS for the side scrolling animation, JS would lag and jump as the code runs asynchronously so CSS was used instead, it still isn’t as smooth as I would like but the effect should be slow and subtle enough that it isn’t distracting.
Some further tweaking of the CSS for alternate screen sizes would help
Static Hosting
I knew I wanted to use S3 and static web hosting for my site. It ticked a few boxes:
- Demonstrates a skill set
- Easy to maintain (No more CPanel!)
- Cheap
Hosting the landing page was easy and something I had together back in August. Yet I did not have a replacement for my blog. There are several blogging frameworks available, the choice was ultimately between Hugo and Hexo. Hugo was appealing purely because I am somewhat fascinated with the Go programing language. Hexo was the winner however, better JS tool chain support and designed as a blogging engine.
Getting started with Hexo
Hexo has a [wide range of themes] that are ready to go, and a development environment for Hexo is relatively easy to setup
It requires:
- NodeJS installed (I’m using V10.16.0)
- Hexo-Cli
- Git
Once you have NodeJS installed you can install Hexo with the Node package manager
1 | npm install -g hexo-cli |
Then you can simply create a directory to start writing a blog in with
1 | mkdir someblog |
2 | cd someblog |
3 | hexo init |
Thats it, hexo generates the files and the platform is ready to work with.
Git is also listed as a requirement by me, it makes the process of installing themes and managing the blog a lot easier. The automation tools I deploy later also depend on Git for them to function.
Installing the theme
I went with the flex-block theme by miiiku kindly shared on an MIT licence.
Themes are simply copied to into the ‘themes’ folder in the root path of the hexo blog, you can also just clone the repo direcly into the themes folder. Then the _config.yml file in the root folder is modified to select the appropriate theme.
1 | theme: flex-block |
Many of the elements were in Chinese (Hexo seems popular in China), so with google translate I went through the .ejs files in themes/layout/ and changed them to english.
Migrating from Wordpress
This was not as clean as I would have liked. It started by exporting a backup of my wordpress site from the wp-admin panel. This is an XML file that has the content and structure of the entire site. This is fed into a hexo migration tool
1 | npm install hexo-migrator-wordpress --save |
2 | hexo migrate wordpress <that xml file> |
In my case, the tool generated ~30 markdown pages in source/_posts/ however the tool does not migrate across images, instead referencing the original hosted wordpress images. So there was the painstaking process of downloading each of the images into source/images/ (or some other location) and updating all of the image links. The same thing applied for every theme, selecting a cover banner image for each post and updating any tags or categories.
With 30 posts this was not the end of the world but it was tedious, I suspect there is a better way.
Testing locally
One of Hexo’s biggest benefits is the local hosting option, running
1 | hexo clear |hexo generate| hexo server |
Removes any previously generated files. creates a fresh set of static files and spins up a webserver to test your fantastic new blog. Saving markdown posts or pages whilst the server is running results in them automatically being regenerated and viewable in the browser.
Blog done
At this point the site was looking right and the existing content had been migrated. The next challenge was how to deploy the site and maintain it long term. I am less likely to write a post if rebuilding and deploying the site is too time consuming and tedious
$git push origin
The workflow for deploying the site or any new posts is super easy and uses the standard git tool chain
- git add *
- git commit
- git push origin
Everything else is handled by AWS! This is the part I am most impressed with and is not something I would have considered possible a year ago.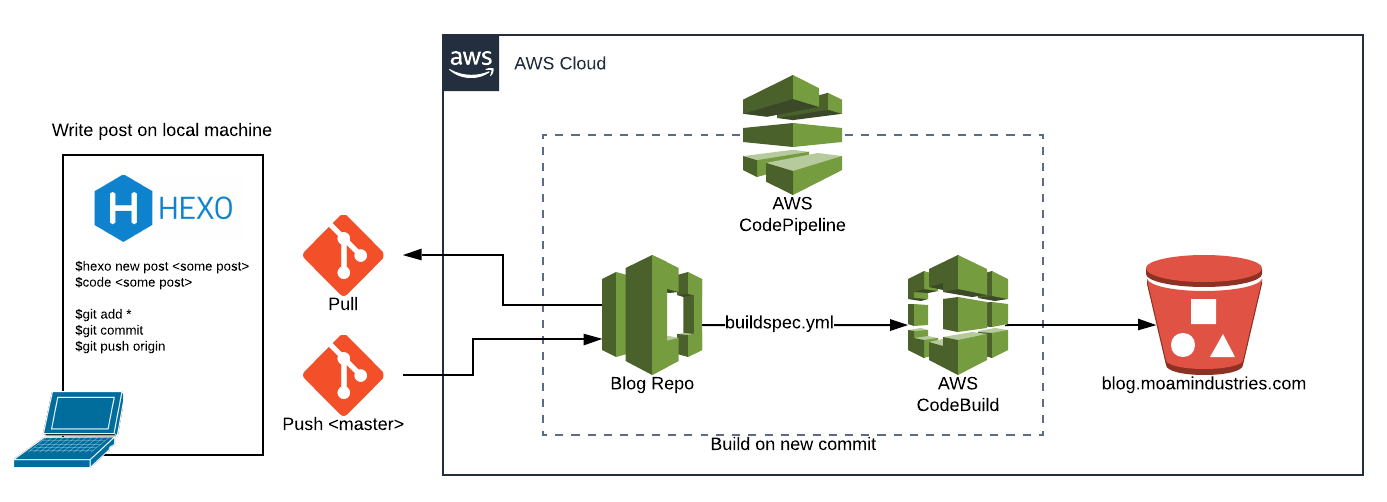
The process is managed by Code Pipeline, utilising Code Commit and Code Build.
- Code Pipeline monitors the master branch of a CodeCommit repository dedicated to the blog
- When a new commit is pushed the pipeline triggers a CodeBuild instance
- Using the buildspec.yml file below the entire blog is generated using hexo-cli in a container
- The files in the S3 bucket are deleted and the freshly generated files are copied across
- An SNS que is updated which alerts me to the status of the build
Remember, the role for CodeBuild must have R/W access to the bucket
buildspec.yml
1 | version: 0.2 |
2 | phases: |
3 | install: |
4 | runtime-versions: |
5 | nodejs: 12 |
6 | pre_build: |
7 | commands: |
8 | - npm install -g hexo-cli |
9 | - npm install |
10 | build: |
11 | commands: |
12 | - hexo generate |
13 | post_build: |
14 | commands: |
15 | - cd public/ |
16 | # Ensure cloud build has a role allowing access to this bucket |
17 | - aws s3 rm s3://blog.moamindustries.com --recursive |
18 | - aws s3 sync . s3://blog.moamindustries.com |
19 | # Clear cached pages from cloudfront |
20 | - aws cloudfront create-invalidation --distribution-id ****** --paths "/index.html" "/page/*" |
21 | # - aws cloudfront create-invalidation --distribution-id ****** --paths "/*" |
Going Live
At this stage I have:
- Shiny new landing page
- Migrated from wordpress to hexo
- Fast easy deployment chain
Everything is ready to go. Now I needed to deploy everything and update my domains.
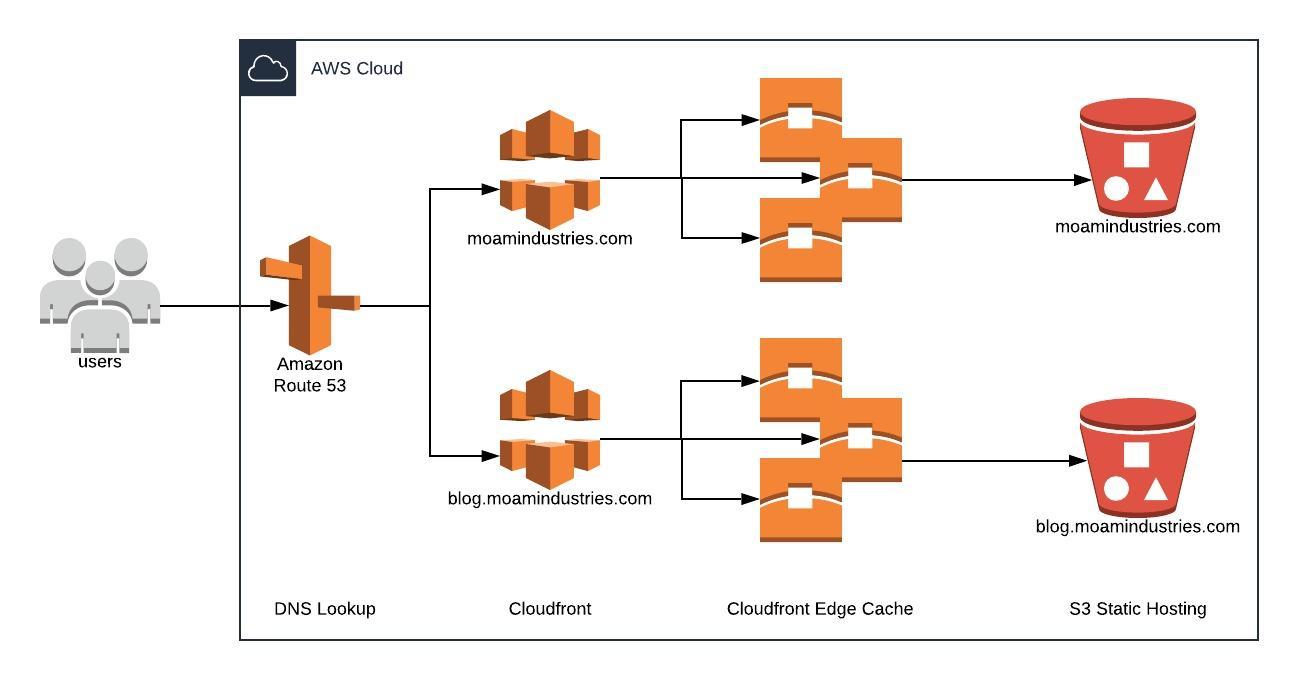
In preparation I had migrated my domain from my current registrar to Route53 and wound down the TTl’s in the hosted zone. I could have kept it with my existing host but they stung me with DNS management fees when I migrated to them (despite checking that first) and it is easier to use AWS resources with route53 managing DNS.
Using Cloudfront adds little extra cost, just some additional caching fees and request management. For the volume of content I expect to serve and the limited traffic a private blog experiences, I’m expecting a bill below $1 per month. Although If a post experiences a traffic spike or gets picked up by another blog I’ll be able to serve it much quicker than my previous hosting provider. However care must be taken to invalidate any pages that are changed else they wont be picked up until their TTL expires in the edge location.
With the final content delivery architecture as below. My site is now active and I can get back to updating this site with some regularity!